
Teambuilding II: Build Your Own
A repeatable 6-step process for building your own Reg M-B team: choosing an archetype, coverage and synergy, using the damage calculator, and avoiding the common mistakes, with a worked Trick Room build.
Last updated · evergreen, updated as the meta evolves
Once you can pilot a proven team, the next step is building your own. Teambuilding isn’t magic. It’s a repeatable process: start with a win condition, add the support it needs, then patch the holes. This guide gives you that process and works a real Reg M-B Trick Room team through it, slot by slot.
The 6-step process
- Pick a win condition. Start with the Pokémon that closes games: a setup sweeper or a hard-hitting cleaner. Everything else supports it.
- Pick your speed control. Match it to the win-con: slow sweeper → Trick Room; fast sweeper → Tailwind; single fast threat → Choice Scarf.
- Add support / disruption. Fake Out, Intimidate, redirection, or screens to buy the win-con its setup turn safely.
- Fill coverage. Add attackers so your four cover the format; no whole type should wall you.
- Patch weaknesses. Look at what beats you so far (a common threat, a shared weakness) and add the answer.
- Tune stat points, items, and leads. Hit the speed tiers and KO benchmarks that matter, respect the Item Clause, and pick a safe lead pair.
Archetypes: pick a lane
An archetype is the shape of your game plan, the engine everything else is built around. Pick one before you pick Pokémon; it tells you what speed control, what win condition, and what support you need. Below are the five you’ll see most in Reg M-B, each with a legal core to start from.
| Archetype | Plan | Legal M-B core |
|---|---|---|
| Trick Room | Invert Speed; slow bruisers move first | |
| Tailwind | Double Speed; fast attackers snowball | |
| Rain | Drizzle + Swift Swim sweepers | |
| Sun | Drought + fast Solar Beam / big Heat Wave | |
| Balance | Flexible; speed control + two win paths | |
| Hyper Offense | Overwhelm before they set up |
Kingambit + Sneasler is the single most successful two-Pokémon core in the current data: two fast, hard-hitting Fake-Out-and-priority attackers that pressure from turn one. If you want a proven hyper-offense spine, start there and build support around it.
Worked example: a Trick Room team
Let’s run the process for a Trick Room build. Trick Room is a great intermediate project: the game plan is clear (set TR, then hit hard first with slow mons), and it teaches you to protect a setter.
 STEP 1 · WIN CONDITION
Torkoal
DroughtThe payoff. Torkoal is one of the slowest Pokémon in the game, which is perfect under Trick Room, where it moves first. Drought plus a sun-boosted, spread Eruption off max Sp.Atk wipes both foes off the field.
 STEP 2 · SPEED CONTROL
Farigiraf
Armor TailThe Trick Room setter. Armor Tail blocks priority moves aimed at it, so a faster Prankster Taunt or Fake Out cannot stop it from setting Trick Room. Huge bulk means it lives to set TR under pressure.
 STEP 3 · SUPPORT
Sinistcha
HospitalityRage Powder redirects attacks off your setter, buying Farigiraf a clean turn to set Trick Room. Hospitality heals its partner on entry, and Matcha Gotcha is a reliable draining STAB. The glue that makes the plan safe.
 STEP 4 · COVERAGE + 2nd WIN-CON
Kingambit
Supreme OverlordA slow physical breaker that also loves Trick Room and gives the team a second win condition. Supreme Overlord powers it up as teammates faint, and priority Sucker Punch lets you keep attacking after Trick Room ends. Its Dark and Steel typing also walls the Ghost, Psychic, and Fairy attacks that trouble the rest of the team.
This core is soft to fast Fairy and to Taunt on the setter (though Armor Tail helps). Round out the six with a Fairy answer and a second bulky attacker (for example a Steel or a Dark) so a single threat can’t sweep you before Trick Room comes up.
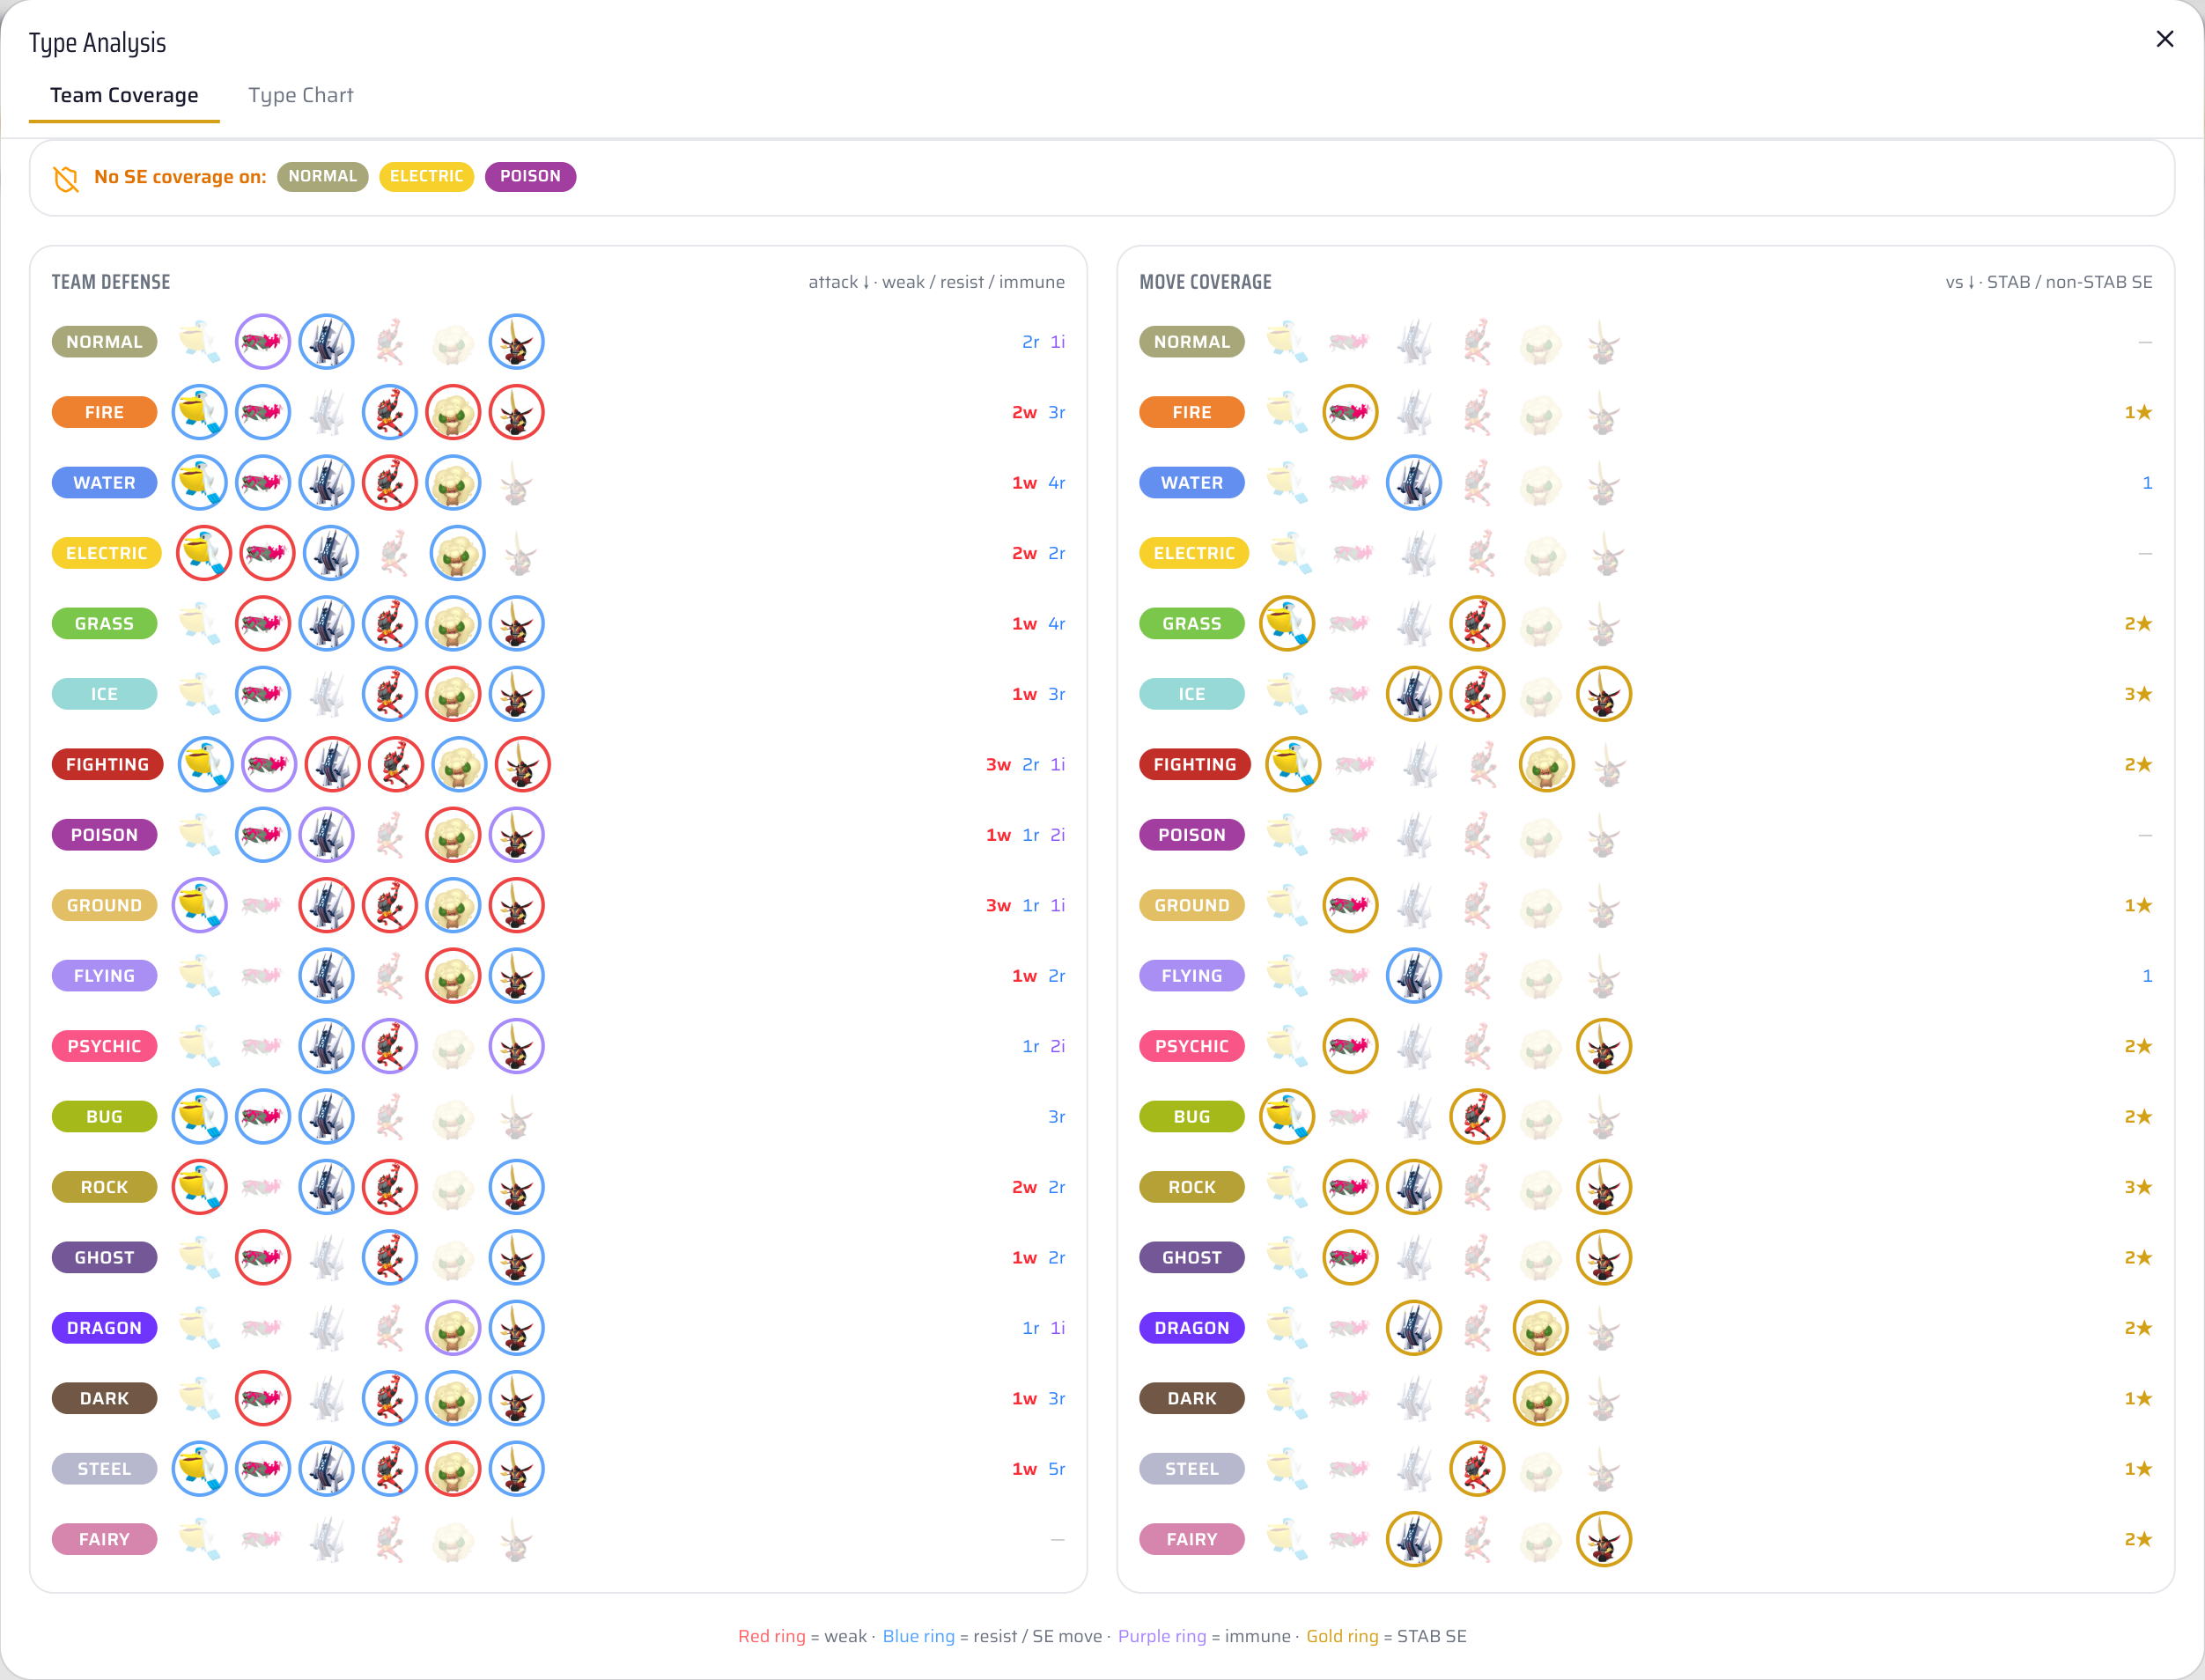
Coverage & synergy
Coverage is offense (do you hit everything?); synergy is defense (do your Pokémon cover each other’s weaknesses?). Torkoal fears Water and Ground, and Kingambit and a Water-resist partner answer both. Farigiraf fears Dark and Bug, and Kingambit (a Steel) walls Bug. When your Pokémon patch each other’s holes, a single threat can’t sweep you.
| Weak Pokémon | Fears | Covered by | Because… |
|---|---|---|---|
| Water, Ground, Rock | Steel/Dark resists none of those but pivots the threat; a Water resist patches the rest | ||
| Dark, Bug | Steel-type resists Bug; Dark hits are answered by focus-fire | ||
| Fighting, Ground, Fire | Grass/Ghost is immune to Fighting-type Close Combat spam | ||
| Ghost, Dark, Fire | Psychic bulk + Armor Tail absorbs the priority Ghost/Dark hits |
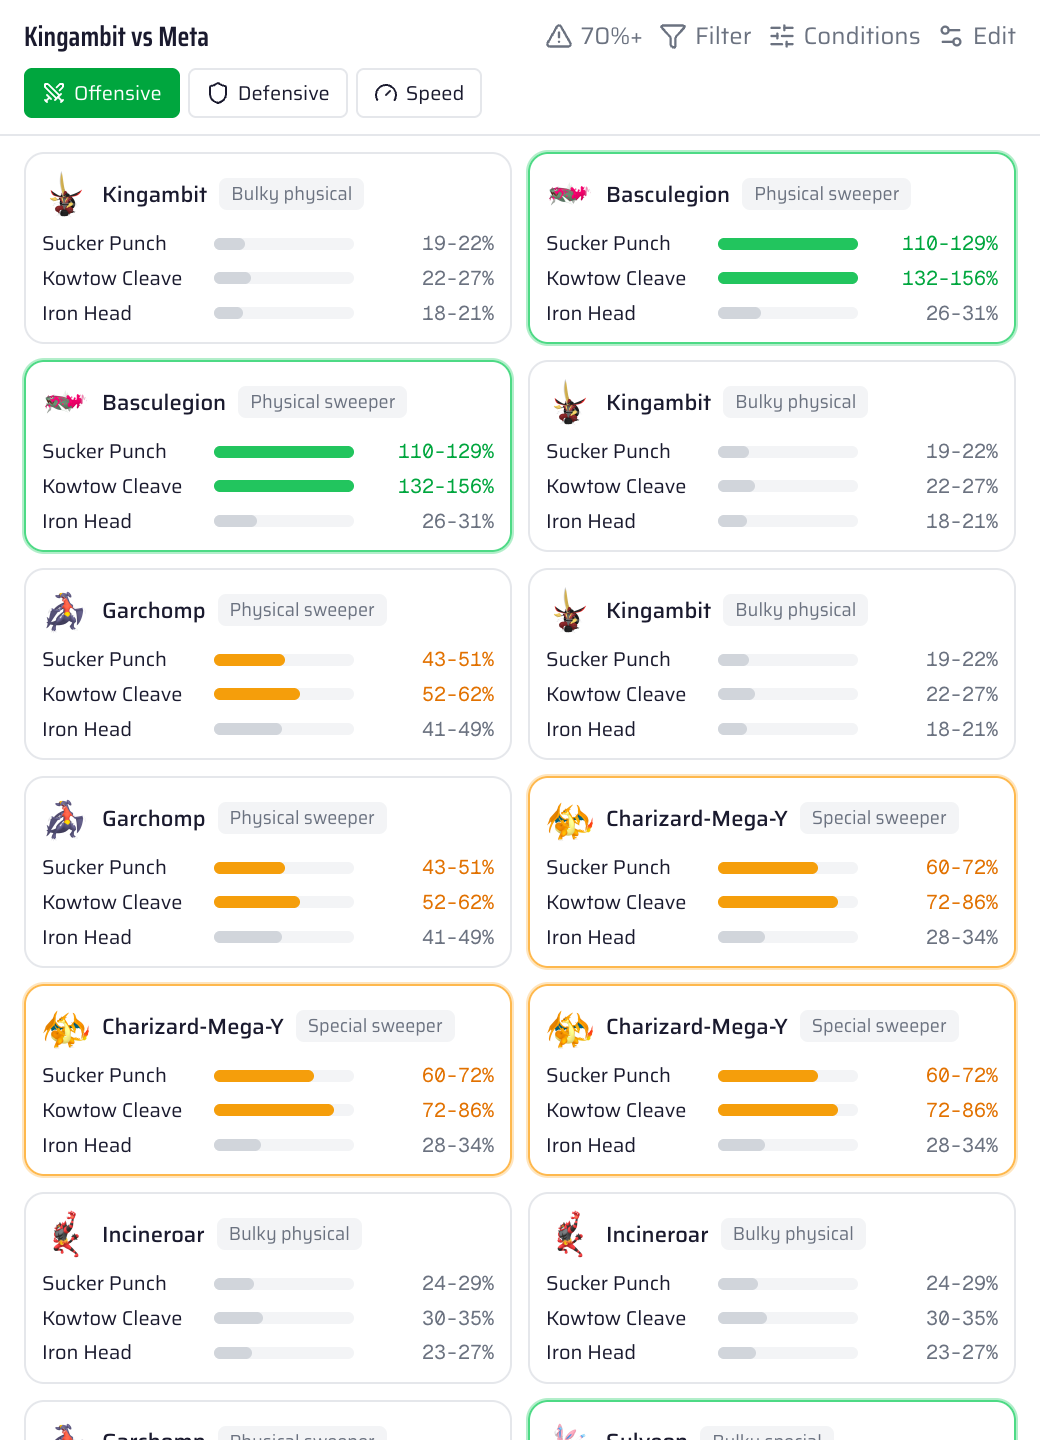
The damage calculator
Every serious builder lives in the damage calc. Before you lock a spread, you check: does my attacker OHKO the thing it needs to? Does my wall survive the hit it’s meant to? The calc turns "I think this works" into "this is a guaranteed KO / a guaranteed survive." Use it to justify every stat point you spend.
A worked example. Say your Torkoal’s sun-boosted, spread Eruption needs to KO the opposing Sylveon under Trick Room. You open the calc, set Torkoal’s Sp.Atk to max, toggle sun and the spread (75%) modifier, and read the result. If it says "guaranteed OHKO," you’re done. If it says "56.3% to 66.7% (not a KO)," you either add a Helping Hand from the partner, chip Sylveon first, or accept it’s a two-move KO. That one check is the difference between a plan and a hope.
| Calc says | Meaning | What to do |
|---|---|---|
| "Guaranteed OHKO" | KOs 100% of rolls | Lock it in: this KO is reliable |
| "93.8% to 112.5%" | Rolls to KO: a high roll KOs, a low one doesn’t | Add Helping Hand or chip first to guarantee it |
| "2HKO" | Two hits KO | Need a partner hit or a second turn |
| "survives, → Sitrus heals" | Your wall lives the hit and recovers | The defensive benchmark is met: good |
| "OHKO’d back" | You die to the return hit | Add bulk, out-speed it, or don’t lead it |
Common mistakes
- No speed control. Six attackers with no Tailwind / TR / Scarf loses the turn-order war.
- No win condition. A team of "good Pokémon" with no closer stalls out and loses long games.
- Shared weakness. Three Pokémon weak to the same type = one threat sweeps you.
- Ignoring the Item Clause. You can’t run two Sitrus Berries; spread your items across roles.
- Untested spreads. If you didn’t check it in the calc, you don’t actually know it OHKOs.